2D City Builder
Throughout the following steps we will create a very simple oldschool city builder from scratch using CCBK. Play an advanced version of it here.
This page covers only the first two evolutions, water and food. A completed version with all stages can be found in the CityBuilderManual project. I believe you will be able to figure the rest out after following the steps laid out here. Religion is very similar to water and pottery has just a slightly longer production chain than food.
Setup
- Create a new unity project using the 2D template (Built-In)
- Remove the Input System Package if installed
- Import TMP Essential Resources (Windows/TextMeshPro/…)
- Import the CCBK Core Framework
(Import the Asset normally, the video imports a custom package because it was made pre release)
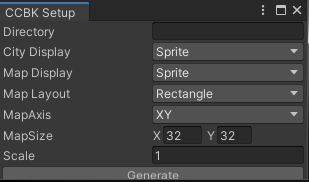
- Generate a basic Sprite based Game (Window/CityBuilder/Setup)
You are now left with a very basic but already runnable game. Save/Load, SpeedControls, Minimap and some other small features are already fully functional. The left bar contains Tools that can build a road and a building that spawns a walker on those roads as well as a demolish tool that destroys them. A single item has also been created that is used up when building.
Check out the Grid Object in the Scene to find stuff related to the grid and the tiles on it. See the Logic Object to see all kinds of Managers that are commonly used. The DefaultItemManager for example manages Items and has a setting that determines the items at the start of the game.
Various Assets have also been generated. The City folder holds all the different parts that make up a city in CCBK.
If you see any gaps between sprites try disabling Anti-Aliasing.
Map
- Place the Manual Assets inside your Assets folder
- Open the Tile Palette Tab found in Windows/2D
(install ‘2D Tilemap Editor’ from Package Manager if the window is missing)- Make sure your active Tilemap is ‘Ground’ and your Palette is ‘HTPalette’
- Draw your map inside the guide lines of the map(turn on gizmos if you cant see it)
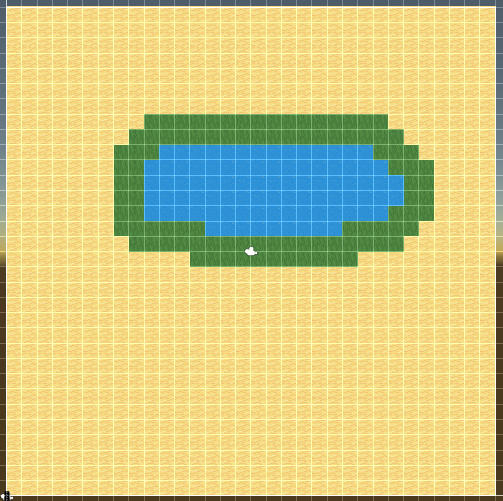
We’ll later add a water layer that spreads out two tiles from water. I’ ve drawn grass tiles there to communicate that to the player.
- On DefaultMap(Grid) replace the groundBlocked Tile in Walking- and Building Blocking Tiles with the same HTWater you just painted onto the ground TileMap
- Set Rotation to Mirror
- Find the RoadTool(UI/Tools)
- Replace its Background Image with HTRoadSN
- On the RoadTool itself click the Road to select it in the Project View
- Replace the Tile with HTRoad
When you start the game now you should be able to draw some nice connecting roads everywhere but on the water.
Water
Supply
- Find the HouseTool(UI/Tools)
- Rename it to WaterSupplyTool
- Replace its Background Image with HTWaterSupply
- Click the BuildingInfo on the BuildingBuilder to select it in the ProjectView
- Rename the BuildingInfo to WaterSupplyInfo
- Key > ‘WAT’ ; Name > ‘WaterSupply’
- Rename the Building Prefab to WaterSupply and open it
- Remove the WalkerSpawner Component
- On the SpriteRenderer of the Sprite Object set HTWaterSupply as the Sprite
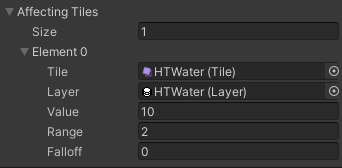
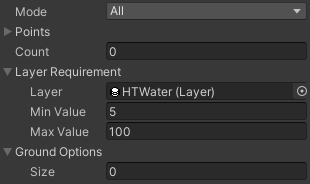
- Create a Layer(RMB>Create/CityBuilder/Layer) in the City folder named ‘WaterLayer’
- In the Scene find the DefaultLayerManager(Logic) and add an affecting tile entry
-
Back in the WaterSupplyInfo add a BuildingRequirement
- Create a Service(RMB>Create/CityBuilder/Layer) in the City folder named ‘WaterService’
Carrier
- Open up the WalkerBase Asset
- On the Sprite Object add the following
- Animator (Controller > HTAnimator)
- UnityAnimatorEvent (Parameter > ‘walking’)
- UnityAnimatorEventVector (Parameter > ‘direction’ ; Set Y > TRUE)
- On the Sprite Object add the following
- Rename WalkerInfo(City/Walkers) to ‘WaterCarrierInfo’
- Rename the Walker Prefab to WaterCarrier and open it
- Sprite > HTCarrierD1 ; Animator > HTCarrier
- Replace the RoamingWalker Script with a ServiceWalker
- Service > WaterService ; Amount > 1000
- Hook WalkingChanged up to SetBool on the UnityAnimatorEvent(Sprite)
- Hook DirectionChanged up to SetVector3 on the UnityAnimatorEventVector(Sprite)
- On the WaterSupply Building Prefab add a ServiceWalkerComponent
- Walker > WaterCarrier ; Downtime > 5
You should now be able to place Water Supplies but only directly next to Water Tiles. They should spawn Water Carriers when connected to Roads that are correctly animated.
Food
Wheat
- Select the currently only Item(City/Items)
- Rename the Asset itself to Gold
- Key > ‘GOL’ ; Name > ‘Gold’
- Create an Empty Gameobject in your Scene
- Reset its Position
- Name it WheatVisual
- Drag the Sprites HTWheatG1-4 from Project View onto WheatVisual
- Order In Layer > 15
- Add a StorageQuantity Visual to WheatVisual
- Swap > TRUE ; Objects > HTWheatG1-4
- Drag WheatVisual into the Items folder and delete it from the Scene
- Create an Item(RMB>Create/CityBuilder/Item) named ‘Wheat’
- Key > ‘WHT’ ; Name > ‘Wheat’ ; UnitSize > 100
- Visuals > WheatVisual
- Add it to the Items Set by selecting it and clicking ‘Find in Folder’
Cart Pusher
- Open up the Walkers Window(Window/CityBuilder/Walkers)
- Copy WaterCarrier and call the new Walker ‘CartPusher’
- Open the Prefab by double clicking the preview image
- Sprite > HTPusherD1 ; Animator > HTPusher
- Replace the ServiceWalker Script with DeliveryWalker
Farm
- Open up the Buildings Window(Window/CityBuilder/Walkers)
- Copy WaterSupply with Key > FAM ; Name > Farm
- Open the Info by double clicking the entry
- Building Requirement - Mode > Average
- Size > 3x3
- Open the Prefab by double clicking the preview image
- Move Pivot X > 1.5 Y > 1.5
- Sprite > HTFarm
- Remove ServiceWalkerComponent
- Add ProductionComponent
- Interval > 20
- Add Items Producer
- Items Item > Wheat ; Quantity > 100
- Storage Mode > Free Unit Capped ; Capacity > 1
- DeliveryWalkers Prefab > CartPusher
- Drag the Sprites HTFarmProgress1-4 from Project View onto Sprite
- Reset the Positions and set Order In Layer > 15
- Add ProgressThresholdVisualizer
- Component > ProductionComponent ; Swap > TRUE
- Add 4 Elements to Progress Thresholds
- 0.2 > HTFarmProgress1 ; 0.4 > HTFarmProgress2
- 0.6 > HTFarmProgress3 ; 0.8 > HTFarmProgress4
- Back in the Scene find WaterSupplyTool(UI/Tools) and clone it
- Rename it to FarmTool
- BuildingBuilder BuildingInfo > FarmInfo
- Background Image > HTFarm
You should now be able to build Farms that visualize their progress and spawn walkers whenever they are done. We’ll take care of storage next so they will have somewhere to go.
Granary
- Open up the Buildings Window(Window/CityBuilder/Walkers)
- Copy WaterSupply with Key > GRN ; Name > Granary
- Open the Info by double clicking the entry
- Remove the Building Requirement
- Size > 4x4
- Open the Prefab by double clicking the preview image
- Move Pivot X > 2 Y > 2
- Sprite > HTGranary
- Remove ServiceWalkerComponent
- Add StorageComponent
- Storage Mode > Stacked ; Stack Count > 8 ; Capacity > 4
- Order Item > Wheat ; Ratio > 1
- Add StorageQuantityVisualizer
- Add 8 Transforms under the Sprite
- Move them to about the center of the granary openings
- Add the to the Origins Array
- Back in the Scene find WaterSupplyTool(UI/Tools) and clone it
- Rename it to GranaryTool
- BuildingBuilder BuildingInfo > GranaryInfo
- Background Image > HTGranary
The Farms Cart Pushers should now carry the Wheat to the Granary. The quantity stored in a Granary should be properly visualized.
Buyer & Seller
- Open up the Walkers Window(Window/CityBuilder/Walkers)
- Copy WaterCarrier and call the new Walker ‘BazaarBuyer’
- Open the Prefab by double clicking the preview image
- Sprite > HTBuyerD1 ; Animator > HTBuyer
- Replace the ServiceWalker Script with PurchaseWalker
- Storage Capacity > 3
- Open the Prefab by double clicking the preview image
- Copy WaterCarrier and call the new Walker ‘BazaarSeller’
- Open the Info by double clicking the entry
- PathType > RoadBlocked
- Open the Prefab by double clicking the preview image
- Sprite > HTSellerD1 ; Animator > HTSeller
- Replace the ServiceWalker Script with SaleWalker
- Open the Info by double clicking the entry
Bazaar
- Open up the Buildings Window(Window/CityBuilder/Walkers)
- Copy WaterSupply with Key > BAZ ; Name > Bazaar
- Open the Info by double clicking the entry
- Remove the Building Requirement
- Open the Prefab by double clicking the preview image
- Sprite > HTBazaar
- Remove ServiceWalkerComponent
- Add DistributionComponent
- Storage Capacity > 5
- Order Item > Wheat ; Ratio > 1
- Purchase Walker Prefab > BazaarBuyer
- Sale Walker Prefab > BazaarSeller ; Downtime > 5
- Minimum Order > 2
- Back in the Scene find WaterSupplyTool(UI/Tools) and clone it
- Rename it to BazaarTool
- BuildingBuilder BuildingInfo > BazaarInfo
- Background Image > HTBazaar
The Bazaar will do nothing but spawn Sellers for now. It will only send out Buyers once a Seller has reported that Buildings on its path need Wheat.
Peasants
Housing
- Create a Population(RMB>Create/CityBuilder/Population) in the City folder named ‘PeasantPopulation’
- Key > ‘PST’ ; Name > ‘Peasant’
- Open up the Buildings Window(Window/CityBuilder/Buildings)
- Copy Bazaar with Key > H1 ; Name > H1Hut
- Open the Prefab by double clicking the preview image
- Sprite > HTHut
- Remove DistributionComponent
- Add HousingComponent
- Add a Population Housing entry with Population > PeasantPopulation ; Quantity > 20
- Copy H1Hut with Key > H2 ; Name > H2Shanty
- Open the Prefab by double clicking the preview image
- Sprite > HTShanty
- Quantity > 35
- Copy H1Hut with Key > H3 ; Name > H3Cottage
- Open the Prefab by double clicking the preview image
- Sprite > HTCottage
- Quantity > 50
- Copy H1Hut with Key > H0 ; Name > H0Property
- Open the Prefab by double clicking the preview image
- Sprite > HTHousing
- Remove HousingComponent
- Add HousingPlaceholderComponent with Prefab > H1Hut
- Back in the Scene find WaterSupplyTool(UI/Tools) and clone it
- Rename it to HousingTool
- BuildingBuilder BuildingInfo > H0PropertyInfo
- Background Image > HTHut
Migration
- Open up the Walkers Window(Window/CityBuilder/Walkers)
- Copy WaterCarrier and call the new Walker ‘Immigrant’
- Open the Info by double clicking the entry
- PathType > MapGrid
- Open the Prefab by double clicking the preview image
- Sprite > HTMigrantD1 ; Animator > HTMigrant
- Replace the ServiceWalker Script with ImmigrationWalker
- Capacity > 10
- Open the Info by double clicking the entry
- Copy Immigrant and call the new Walker ‘Emigrant’
- Open the Prefab by double clicking the preview image
- Replace the ImmigrationWalker Script with EmigrationWalker
- Open the Prefab by double clicking the preview image
- On the Logic Object in the Scene add a Migration Component
- Immigration Walkers Prefab > Immigrant ; Count > 10
- Emigration Walkers Prefab > Emigrant ; Count > 10
- Entry > Logic ; Population > PeasantPopulation
- On the Logic Object add a DefaultPopulationManager
When you start the game now and build Housing the Migration should spawn Immigrants that occupy the properties and turn them into Huts.
Evolution
- Create an EvolutionSequence(RMB>Create/CityBuilder/EvolutionSequence) in the City folder named ‘HousingEvolution’
- 0 Building Info > H1HutInfo
- 1 Building Info > H2ShantyInfo Services > WaterService
- 2 Building Info > H3CottageInfo Items > Wheat
- Add Evolution Components to H1Hut, H2Shanty and H3Cottage with
- Evolution Sequence > HousingEvolution
- ServiceRecipient
- Service > WaterService ; Loss Per Second > 5
- ItemsRecipient(only H2 and H3)
- Item > Wheat ; Consumption Interval > 2
- Storage > Free Item Capped ; Capacity > 10
Your Huts should now turn into Shanty when a Water Carrier passes them. Once a BazaarSeller provides them with Wheat they should turn into Cottages. You might want to give yourself some more gold by increasing the Quantity in DefaultItemManager(Logic).